AV Setup for Meetings
by overcast
A portion of the monthly meeting features recording of both audio and video. This post documents the setup from the facilitator’s point of view.
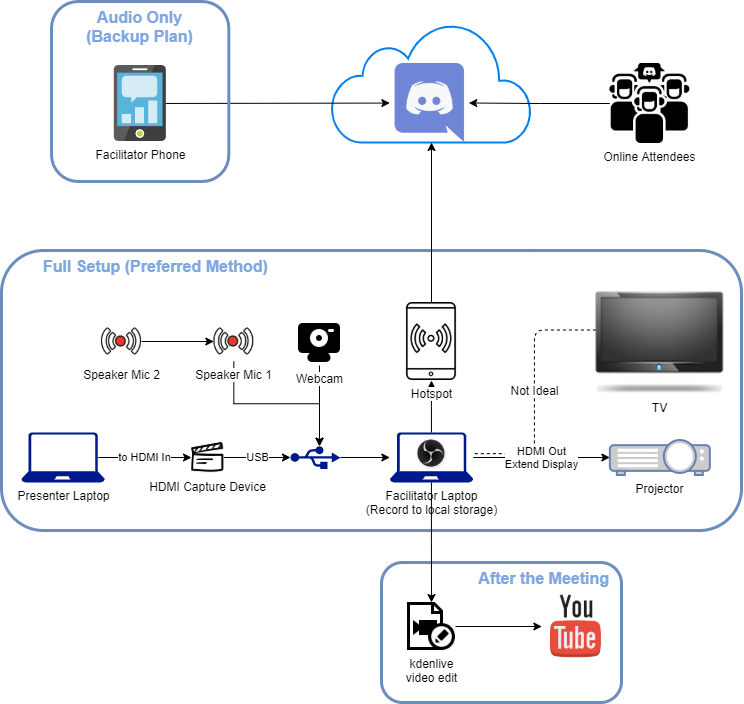
Here’s a diagram of the two setups.
About the Roles
This may seem obvious but it is better to level set than assume.
- Presenter = the person(s) speaking on the main topic.
- Lead = Manages the in-person signage, contact phone, and opening the door for in-person attendees. In DEF CON parlance, a Goon.
- Facilitator = AV person. Manages OBS, conference speaker mics, and the projector or TV. This should not be the same person as the speaker/presenter or a lead.
- Online Attendee = a person who attends the meeting via Discord. They are muted from recording and must ask questions in the channel for the presenter.
- In-person Attendee = someone who physically attends the meeting on-site. If in-person please do not join the Discord meeting from your device(s).
Full Setup
Device List
- Hotspot Internet connection for the facilitator and only the facilitator
- Laptop with HDMI out and at least 3 x USB 3.0+ ports or a USB hub
- Software (install and test well in advance of the meeting):
- OBS installed on the laptop
- Libre Office Impress or that other presentation software
- kdenlive to edit the video recording from OBS
- DC864 Facilitator Kit - this zip file contains the slide deck, a canned video of the opening, and OBS config files
- Conference speaker/mic - One is a minimum, two may be daisy-chained. Two leads each have one in case only one person is able to make the meeting. Never use the built-in laptop mic as it picks up every click of the facilitator keyboard and mouse and has poor gain for the presenter attendees.
- Luna eMeet USB/Bluetooth, daisy-chained if two are available on-site
- Generica desk mic on a tripod
- 1080p Webcam - aimed at the speaker or room depending
- Projector or TV - If not available the meeting will be audio-only, skip to the next section “Audio Only Setup with Discord”.
- HDMI capture device over USB 3.0+ - Optional. Only needed if projector or TV is available. HDMI In from the presenter’s laptop.
- Power strip - typically on-site already but better to be safe.
Configure OBS
- Install OBS
- Download the DC864 Facilitator Kit zip file
- Extract the dc864-facilitator-kit.zip file to the C:\dc864-facilitator-kit directory.
This next step will configure your OBS install to pull text and graphic files from C:\dc864-facilitator-kit. If you extracted to a different directory OBS will prompt to locate the missing files. - Then extract and overwrite existing contents with the c:\dc864-facilitator-kit\appdata-roaming-obs-studio.zip to C:\Users\YOUR_USERNAME_HERE\AppData\Roaming\obs-studio.
A key gap are any non-redundant gear such as the webcam or HDMI capture device.
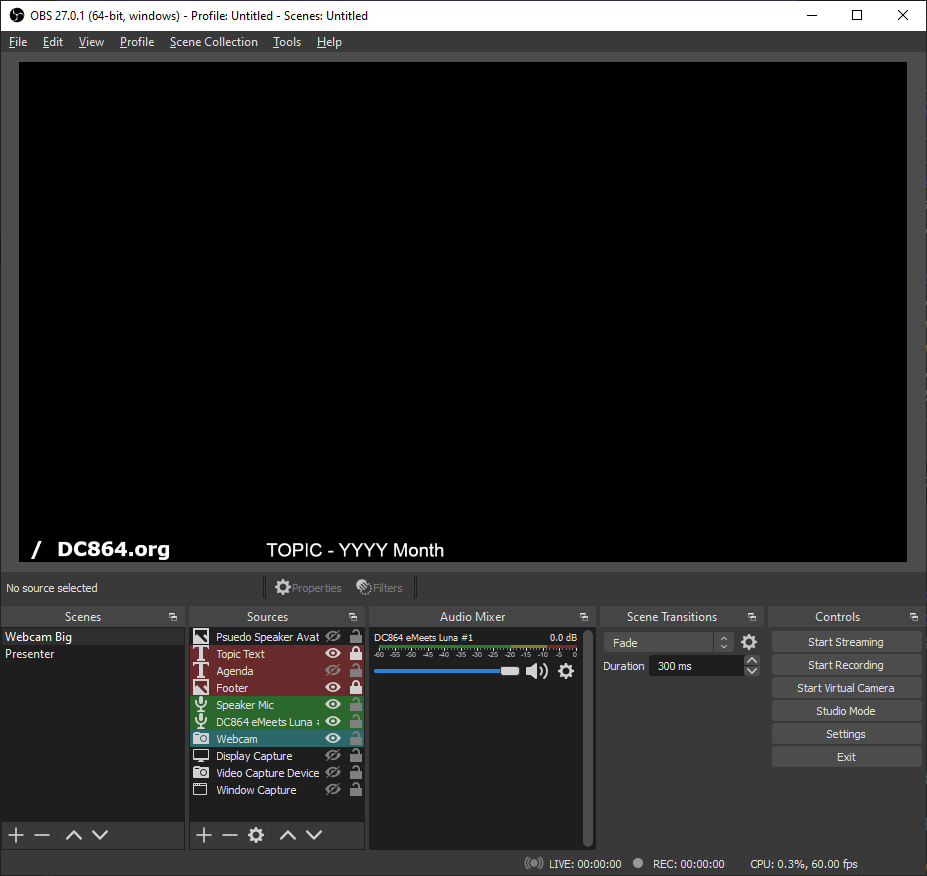
When launching OBS it should look like this.
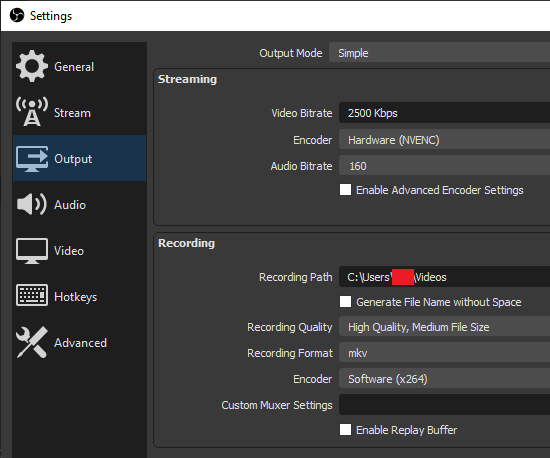
 With these output settings.
 Pre-Meeting AV Checklist
Arrive at the venue early to setup the gear and run quality tests. The lead(s) post signage so attendees can locate the meeting room. A sign is posted in the room indicating recording is in progress and the code of conduct.
On the facilitator laptop in Windows Taskbar Settings ensure “Show taskbar on all displays” is disabled. Otherwise your taskbar will overlay the stream and recording. Not cool.
Plug in the power strip for laptop and projector. Do this right way so that it isn’t overlooked leading to something powering off during the meeting.
Daisy chain the two conference speaker mics then plug into a laptop USB port. Verify the OBS profile is picking up room audio from the mic. Disable all other microphones listed in OBS. Is also a good idea to right-click Hide the unused mics in OBS.
The USB HDMI capture device needs a powered port which typically does not happen with a USB hub. Be aware that if no input or output is occurring the HDMI capture device needs to be attached directly to the laptop USB port. The presenter will connect their HDMI out to the facilitator’s HDMI capture card In port and then duplicate their displays. What the presenter sees on their laptop should now be visible in OBS.
The facilitator laptop sends either HDMI out from the laptop or capture device HDMI Out to the projector.
Even a partial setup involving only the OBS laptop and one speaker/mic can provide an quality audio-only recording of the meeting.
Launch Libre Office Impress and play the automated slide show to the projector. Alternatively, you could play the canned video on loop fullscreen on the projector.
In OBS, right-click on the preview screen, select “Fullscreen Projector (preview)” and the projector display from the pop out menu. Start recording in OBS.
In Discord voice channels select DC864 Monthly Meeting and share the projector screen. This should allow all online attendees to see the scenes shown through OBS.
The Meeting
The facilitator starts the meeting in Discord on their mobile phone. All in-person attendees should not connect to the audio in Discord as it will create a reverb echo chamber that’s painful for all attendees to hear.
Upon opening the meeting a verbal reminder to all attendees should be made regarding the code of conduct and expectations for an enjoyable meeting.
Throughout the meeting the facilitator will focus on two things: Discord chat and OBS scene selection.
During the meeting the facilitator will need to watch Discord for any questions or comments by online attendees. They may also need to remind of the code of conduct and in a worst case mute or kick an attendee from the Discord meeting.
There are two scenes in OBS. Webcam has a fullscreen view of the presenter and no screen share from HDMI in. Presenter is a full-screen duplicated display of the presenter desktop and a small webcam view in the lower right. As desired the facilitator can click on each scene to transition to highlight one or the other for those watching on Discord or the recording.
At the close of the meeting the facilitator or a lead should remind attendees to continue the conversation in the appropriate Discord channel. Try to guide the follow up discussion into the best channel based on the topic and resist the urge to default to General Chat.
In OBS, stop recording.
Go to the Closing section below.
Audio Only Setup with Discord
Welcome to the podcast. jk. This is a bare minimum, simple setup to facilitate a meeting for both online and in-person. In this scenario, no recording will be captured.
Device List
- A mobile phone with data to spare and battery life for 30-45 minutes of active screen time
- Discord app signed into DC864
Facilitating the Meeting
The facilitator starts the meeting in Discord on their mobile phone. All in-person attendees should not connect to the audio in Discord as it will create a reverb echo chamber that’s painful for all attendees to hear.
Upon opening the meeting a verbal reminder to all attendees should be made regarding the code of conduct and expectations for an enjoyable meeting.
During the meeting the facilitator will need to watch Discord for any questions or comments by online attendees. They may also need to remind of the code of conduct and in a worst case mute or kick an attendee from the Discord meeting.
At the close of the meeting the facilitator or a lead should remind attendees to continue the conversation in the appropriate Discord channel. Try to guide the follow up discussion into the best channel based on the topic and resist the urge to default to General Chat.
Go to the Closing section below.
Closing
The Video - only applies if video or audio were recorded
OBS recording produces a MKV file. Open kdenlive and import the clip. Drop the clip into the tracks. It’s important to drop this on the track first because it will define the resolution settings.
Resist the urge to edit in YouTube. We cut out sensitive or seemingly career-limiting move conversation segments and would rather those not be in the Google cloud.
Import the canned video clip of the opening slide deck. Drag it to the front of the track. Click the preview Play button to verify the length is good and the video plays as expected.
Right-click the track and select “Remove space in all tracks”.
Click the Render button in the top menu and export to WEBM-VP8 or MP4. Set the output file name to “YYYY-MM-TOPIC”. Click Render to File and grab a cup of tea.
Once complete upload the video to the DC864 YouTube channel and copy the video link.
Blog Post
The facilitator should recap the meeting in a blog post on the dc864.org website. This doesn’t need to be a word for word transcript but a summary with direction on the Discord channel hosting the follow up discussion.
Embed the YouTube video (paragraph Plus sign > Browse All > Video) at the top of the post.
Create a Featured Image in Canva or Gimp with 300 x 200 px or 600 x 300 px.
Set the blog post Category to “Meeting Recap”.
Add appropriate tags.
Schedule or publish the post.